I wrote this article for the IPSwitch website on Nov 2020. I am posting it here for archival purposes. I have reformatted it for readability and grammar.
TABLE OF CONTENTS
- Define search criteria
- Find account inactivity properties
- Logon attributes explained
- Building the Automation
- Wrapping it all up
Active Directory is a directory service that maintains information about users, computers and related objects. It is a database of relational information that needs periodic maintenance to remain useful and relevant. A directory will have accounts no longer used. Finding those accounts in Active Directory is not as easy as it sounds at first glance. Let’s walk through finding inactive user accounts and automating removing them.
Define search criteria
We need to define what we need for our process. Our goal is to locate employee accounts that have not logged into the network for an extended period. I’ve always used 90 or 120 days as a good measure to query inactivity by. You can go as low as 30 days before the results become not relevant, but higher values are better. You need to decide what is right for your organization. 90 days gives a big enough cushion to allow for people out of the office for vacation, family emergencies, or extended medical leaves. Once the accounts reach 90 days of inactivity, we want to disable those accounts and move them to a separate OU.
Defining what we are looking for first allows us to build a simple rule set to follow. Our rule set looks like this:
- Find and disable active accounts that have no logon activity for 90 days.
- Move each disabled account into the Disabled-Users OU
- Mark each disabled user with a comment that an automated process disabled it.
Find account inactivity properties
Each user account has several attributes containing login information. We want to find attributes that show last login time. If we can find those attributes, we can use them to query for accounts not logged in since a certain date. We’ll use PowerShell to display all the attributes and select an attribute to work with.
Get-ADUser is the most used cmdlet for showing user information. You could use Get-ADObject or Search-ADAccount, but Get-ADUser is what I have chose to use this task. To show all the user properties, we need to add -properties * to the cmdlet syntax. Leave that syntax out, and AD will only return the 10 default properties.
Get-ADUser Michael_Kanakos -Properties *
We return a long list of fields from our query (over 150!). We can search for attributes contain particular words by using wildcards. This helps us locate attributes that may be useful for our task. We want to find logon information, so let’s search for attributes containing the word Logon.
Once PowerShell returns all properties, we should limit the list of properties to only the ones that the match word Logon. Select-Object provides the ability to do a wild-card match and limits our results. The | character (called “the pipe”) takes the results on the left and passes them to Select-Object. Select-Object then performs the wild-card matching and then limits the results based on our wild-card criteria.
Get-ADUser username -Properties * | Select-Object *logon*

BadLogonCount          : 0
lastLogon              : 132181280348543735
LastLogonDate          : 11/11/2019 9:08:45 PM
lastLogonTimestamp     : 132179981259860013
logonCount             : 328
LogonWorkstations      :
MNSLogonAccount        : False
SmartcardLogonRequired : False
We return a long list of fields from our query (over 150!). We can search for attributes contain particular words by using wildcards. This helps us locate attributes that may be useful for our task. We want to find logon information, so let’s search for attributes containing the word Logon.
Once PowerShell returns all properties, we should limit the list of properties to only the ones that the match word Logon. Select-Object provides the ability to do a wild-card match and limits our results. The | character (called “the pipe”) takes the results on the left and passes them to Select-Object. Select-Object then performs the wild-card matching and then limits the results based on our wild-card criteria.
The | character (called “the pipe”) takes the results on the left and passes them to Select-Object. Select-Object then performs the wild-card matching and then limits the results based on our wild-card criteria.
Get-ADUser username -Properties * | Select-Object *logon*

BadLogonCount          : 0
lastLogon              : 132181280348543735
LastLogonDate          : 11/11/2019 9:08:45 PM
lastLogonTimestamp     : 132179981259860013
logonCount             : 328
LogonWorkstations      :
MNSLogonAccount        : False
SmartcardLogonRequired : False
Your results may vary based on what your Active Directory domain functional level is. My search returns eight attributes, three look promising: LastLogon, LastLogonDate and LastLogonTimeStamp. Some values may look a little weird if you are unfamiliar with how Active Directory stores date/time information in certain attributes. Some date info is traditional date-time info, and others are are saved as “ticks”.
Ticks are a time format in .NET Framework and start at 12:00 AM January 1, 0001. Ticks are equal to one ten-millionth of a second, which means there are 10,000 ticks per millisecond. PowerShell and .NET Framework both can use ticks to represent date-time values. There are math cmdlets that can convert ticks into a standard date format.
PowerShell shows the actual value for the tick that represents the date/time. The ticks are converted to a more time-date friendly format in AD Users and Computers or AD Administrative Center.

Logon attributes explained
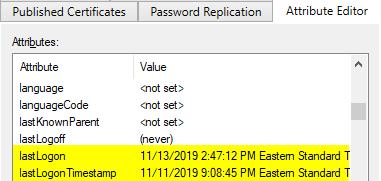
Our search found multiple properties that show date/time logon information. One property has a different time stamp than the others.
What's going on here?
The variance in date-time info is by design. AD limits the amount of data that is replicated for each object. This protects DC’s from getting overwhelmed with a large amount of replication traffic. The LastLogon property updates every time you authenticate, but the data remains on the DC you authenticated against; the other DC’s don’t replicate it. The LastLogonTimeStamp and LastLogonDate properties are replicated to all DC’s but only infrequently.
Notice how the delayed replication information could affect our query. The LastLogonTimeStamp is actually two days behind in this example. Every time a user interactively logs in, touches a network file share, or performs other activities they are authenticated, and that data is stored in Active Directory. However, our DC’s could be overwhelmed in a large environment if they replicated logon time stamps EVERY TIME someone touched something on the network. Microsoft solves this problem by keeping multiple sets of logon information. Some of the logon information is accurate but not replicated, and some logon information replicates, but only occasionally.
For our requirements, we don’t need the EXACT logon time stamp. We only need to find accounts that haven’t been used in awhile. Any value works, as long as the value is greater than 90 days. If we use my logon dates as an example, the time queried could be 11/11 or 11/13 depending on the value we use.
Fast forward three months and assume I never logged on again. One date would flag as inactive for being over 90 days and one field would not. But if I set up this process to run monthly, I would catch the account the next time we check. That’s the important part. If we do this regularly, we can use either field as long as we consistently check.
Building the Automation
I used the LastLogonDate property for two reasons. First, it’s already a date value, so I don’t have to deal with converting the value. Second, it’s a replicated value, and that makes my life easier. This in not the case if I used LastLogon. The time stamp isn’t replicated often and not accurate for people authenticating against multiple domain controllers.
I would need to query every DC an my network and check every user. Then I need correlate the results to end up with the latest results for each user. That is a very time consuming and time-intensive task that I want to avoid if possible. To get the info on a single account using LastLogonDate, the code is simple.
get-aduser Michael_Kanakos -properties LastLogonDate | Select-Object Name, LastLogonDate

Name     LastLogonDate
----     -------------
mkanakos 11/11/2019 9:08:45 PM
It takes a bit more code to do this for all my users. We need to use a filter to query all user accounts.
Get-ADUser -filter * -properties LastLogonDate | Select-Object Name, LastLogonDate
Let’s find only the accounts with a logon date greater than 90 days. We need the current date saved to use as a comparison operator.
$date = (get-date).AddDays(-90)
Get-ADUser -Filter {LastLogonDate -lt $date} -properties LastLogonDate | Select-Object Name, LastLogonDate
This code retrieves all users who haven’t logged in over 90 days. We save the date 90 days ago to a variable. We can create an AD filter to find logons less than that date. Next, we need to add on the requirement to query only active accounts. In this example, I am using splatting to make the code readable.
Splatting AD cmdlets can be tricky but the code is easier to read and understand. Below is the code example using splatting. The more traditional, long-form version of the syntax is displayed underneath the splatting example.
$date = (get-date).AddDays(-90)

$paramhash = @{
    Filter =        "LastLogonDate -lt $date -and Enabled -eq $true"
    Properties =    'LastLogonDate'
}

$SelectProps =            'Name','LastLogonDate','Enabled','DistinguishedName'

$InactiveUsers = Get-Aduser @paramhash | Select-Object $SelectProps
$InactiveUsers = Get-ADUser -Filter {LastLogonDate -lt $date -and Enabled -eq $true} -properties LastLogonDate, DistinguishedName | Select-Object Name, LastLogonDate, Enabled, DistinguishedName
This gives us our inactive users who are enabled. We save the results to a variable for re-use. The DistinguishedName property is needed later on. Once we find the users, we can work on our next step: disabling the accounts. We use the Set-ADUser cmdlet to make AD user account changes.
$Today = Get-Date
$DisabledUsers = (
    $InactiveUsers | Foreach-object {
        Set-User $_.DistinguishedName -Enabled $false -Description "Acct disabled on $Today via Inactive Users script"}
    )
We have disabled our user accounts. It’s time to move them to a new OU. For our example, we’ll use the OU named Disabled-Users. The Distinguished Name for this OU is “OU=Disabled-Users,DC=Contoso,DC=Com”. We use the Move-ADObject cmdlet to move users to the target OU
$DisabledUsers | ForEach-Object {
    Move-ADObject $_.DistinguishedName -TargetPath "OU=Disabled-Users,DC=Contoso,DC=Com"}
In our final step, we use the Move-ADObject to move users into a new OU. We now have the core code needed to make a reliable, repeatable automated task.
So what’s next?
That depends on your individual requirements. This could be done every month. You could create a Scheduled Job to run the code on a schedule. We could add more code to make it better. Code for error checking and additional user information fields would be two useful additions.
Most teams running these types of tasks generate a report of what they disabled for someone to review, so the additional fields will vary. You could include more fields from Active Directory to make a report more useful. We could take this task one step further by creating another task to delete those disabled user after 6 months.
Wrapping it all up
Solving challenging automation requests is much easier when the tasks are divided into manageable pieces. We started with requirements and built up our syntax in small steps; confirming that each step works before trying to add in another variable. By doing this, we made this task easy to understand and hopefully a great learning experience.


